I began this project as something “just for fun.” For a few years now, photos taken of the giant Iguanas on the island of Cayo Largo, off the southern coast of Cuba (Iguanas below), have been waiting for an opportunity to realize themselves. SAQA’s call for entry, “Fur, feathers, fangs and fins” seemed the perfect fit!

Here we go: I envisioned a wall mounted work to reflect the rock face with the Iguana basking on a rocky ledge. I had saved a silk fusion “skin” from a previous rock sculpture which was never completed. This I thought would give me a leg up on the project. I had also envisioned some very textured remnants of handwoven fabric from my weaving days, covering the rock face and in fact, the Iguana itself – a perfect camouflage fit.

That aside, I began with the construction of the creature. What to use as an armature? I could see some left over pool noodles as just the right size and nice an squishy to shape the body, but wire was also necessary to keep that shape and to fashion legs and toes – oh those toes! How many are there? I researched on line only to read that they could be anywhere from 3 – 5. I zoomed in on my own photos and determined in the end that the Cuban species had 5 and that was what I would go with.

I built a “cage” around the noodles to flesh out the body; however that would not be enough to support the outer skin. I filled the gaps between with leftover polyester stuffing. This all had to be covered to create a nice even and solid surface onto which I would “dress” the Iguana. I searched through my tape supplies to find a cloth tape that would both smooth and hold everything together quickly without having to wait for drying. When fashioning the rock, I had used both PVA and cellulose paste with strips of cotton and cheesecloth – hours of work and time to wait while it all dried.

This rudimentary Iguana shape took about 3-4 hours to construct and was about life size. Gee, I had looked over the prerequisites for SAQA’s call and recalled a very large window of sizing options, so dismissed that and became immersed in the creative process.

I’m starting to “see” an Iguana and it’s turned out life-size. All has been formed by looking over a selection of my own and some posted images of Cuban Iguanas from Cayo Largo and one of its outlying small islands. Apparently, you can take an excursion there to be among the creatures on the beach! https://www.youtube.com/watch?v=NZFskkl3yEo you might like to check this video out. The face was certainly far from correct, but, understanding anatomy, there has to be an allowance for the eyeballs, so plenty of that space.

The head structure took a little problem solving: I had some silk fusion fabric left over from the “rock” structure, some toy animal eyes, lots of cheesecloth for a cloth version of papier mache and determination. The head was shaped by building up the structure of the skull, mouth and eyes temporarily inserted (they were blue which didn’t work, so that had to be sanded off and painted white – on the back). With a series of pleated silk fusion shapes, handstitched, the head slowly began to take shape.
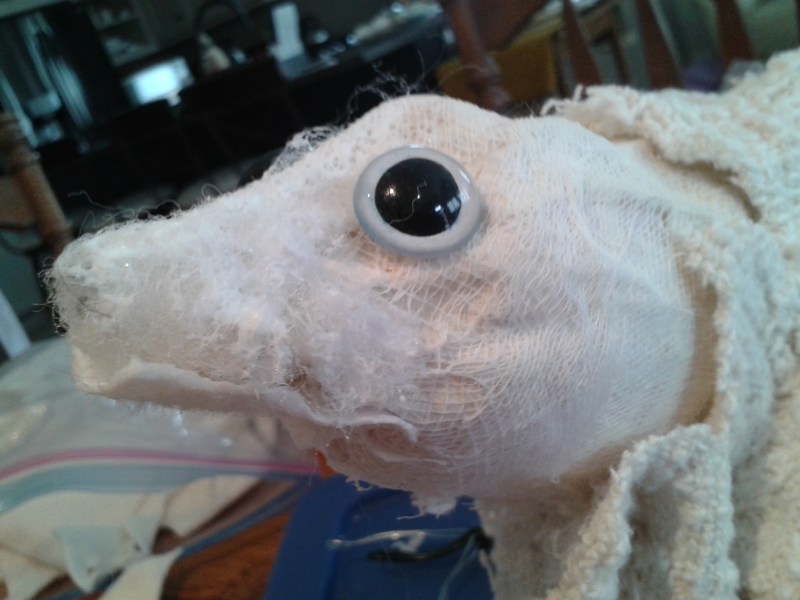
Now for the actual “dressing” of the Iguana which I am separating in this blog, but during the actual process, both head and skin were developed simultaneously.

A new update on “WordPress” is allowing the descriptions to show on the actual image, so here in sequence, you can now “read” the process. With a combination of stitching by hand and machine, and using PVA glue to adhere the skin to the body structure, the Iguana is beginning to take on an almost “lifelike” form. It’s almost creepy to hold the life size creature. When our children were young, we had a “pet” Iguana. I don’t believe I ever held it!

Key concepts from 101

Linear perspective, atmospheric perspective, horizon line, vanishing point, organic lines, foreground, mid-ground and background.

This time we are going to apply these ideas/concepts to this architectural form of a modest country church. This is not my own photo.

You will need a regular sheet of letter size paper and a legal sheet (or 2 sheets of letter paper taped vertically) and soft, sharp pencil.

Please do not use a ruler and avoid an eraser until the end.  You could spend the entire exercise erasing and becoming frustrated.  Practice with your pencil until your lines are soft and easily corrected—without an eraser.  Curl your hand so that you can use the outer/baby finger side to slide across the paper as a guide.

In this exercise we are going to use 2 point perspective where previously we used just a single vanishing point.

1.To create markers:  Fold your larger sheet in half horizontally.  Make a visible dot on each end of the horizontal line.  These indicate the horizon and are your vanishing points.  In the picture, the trees obscure the horizon.

2. Take your smaller sheet and fold in half horizontally, then again horizontally to divide the sheet in quarters.  Do the same vertically to create a second set of quarter lines.  There should be 16 rectangles dividing your sheet.

3. Place the smaller sheet vertically on top of the horizontally oriented, larger sheet.  Centre vertically but align the bottom edges.  Tape to hold in place if you like.

4. To create the first pencil line indicating the line of the church where front and side walls align:

Step 1: From the right bottom edge count one and a half spaces in and mark with a dot in the centre of the space.  Step 2: Count 2  half spaces up and make a second mark. 

Step 3. Make a line to create the vertical wall abutment which is closest to the eye (between the window and door).

5. Getting the perspective of the walls:  Without using a ruler, draw a line from the bottom dot to the right hand vanishing point ( on the bottom layer of paper).  Again, the top dot to the same vanishing point—you should have a long, narrow triangle.  Do the same from the top and bottom dots to the left vanishing point. 

6. Create your outside verticals:  The left is about one and a half rectangles in and the right about 3/4 of that rectangle in.  You should now have a box with slightly diagonal lines top and bottom but should have true vertical walls.

7. Roof:  Make a dot in the centre of your page.  From this point join with a line to the left outer wall and a second line to the centre wall. You should have a triangle.  From the centre dot, extend your line to the right hand side vanishing point to determine the slope.  For the top of the roof, count one and a quarter squares in and make a mark to join the roof to the top of the right hand wall.  Join the 2 lower points to form the bottom edge of the roof.

Window and door:  determine the height with small dots .  Although they are actually centred on the building, the near wall portion should be slightly wider than the distant portion to allow for perspective. When adding any detail that requires perspective lines e.g. sills and lintels, use your vanishing points to determine the slope.  Guessing could give you a line that looks askew.

8. Bell tower:  Start with the vertical join which is slightly to the right of your centre line.  The top is slightly higher than your first fold at the top of the page.  Mark and joint with a vertical line.  Extend upwards for the cross.  The top of the cross should be on the same slope as the walls—use your left vanishing point.

9. Roof line slopes:  From the ball, make a diagonal about 1/2 inch out on either side and about half way down.  Notice that the tower is joined into the roof about 1/2 inch down and the top structure sits on a small “foundation.”  Use the vanishing point on the right to determine the angle.  Create the inner framework of the window openings and extend the roof seams  of the tower from the window peek to the tower peek at the ball.

At this point you can take out a ruler and eraser to neaten things up—but you may like the way it looks drawn freehand.  Be sure that all vertical lines are TRUE verticals and all lines that would be “horizontal” on the actual structure, go back to the vanishing points on a diagonal, even if they are just tiny window sill lines.  This drawing will serve as your pattern.

Now that you have your church drawn (congratulations, this was not an easy exercise), continue to add the background and any details that you would like to add in, although that can happen as you work on your textile or fibre piece.  Just remember the perspective rules:  Objects and details are larger in the foreground than in the distance and atmospherics can create more depth to your work. 

Steps outlined visually.

The SAQA pod has taken up the challenge to render this more difficult exercise.

Effie took the concept to re-imagine the traditional “log cabin” quilt. Here she has placed the structure within a forest with a path leading to the front door. The colours give us a “rustic” feel and even earthy smell of an evergreen forest.

Pam has interpreted the “grain elevator” icon from her connection with the “prairies” of mid western Canada. The beautiful perspective of the structure and linear rows of grain is enhanced by the addition of the foreground hay wagon. The eye is led into the scene and wanders through via the linear connections. Colours and fabrics are well-chosen to provide the illusion of light.

Comments: A little more angulation upwards of the cabin’s right side foundation line and windows would give a feeling of receding into the distance. Exaggeration of the path’s width as is leads forward would provide a foreground dynamic and work in conjunction with the larger tree forms.

The wagon in the prairie scene is beautifully rendered. A slight exaggeration of this form would also provide further dynamic to the feeling of foreground perspective.

Both wonderfully executed.

This is a significant date for Southern Ontario, for the SAQA (Studio Art Quilt Associates) organization and for me personally. It represents the beginning of an unexpected change in our lives: Ontario was on the brink of closing down many non-essential businesses and events and its citizens going into self-isolation, and SAQA’s first international conference was on the brink of opening in Toronto that coming week. All was rapidly changing.

As I made my way down the Niagara escarpment to work at the Jordan Art Gallery , I saw before me a compelling site:

It was an image that would not leave me and percolated through my thoughts until early October. (Meantime, SAQA held its global conference in virtual time – one of the first organizations to do so via the Zoom platform. It was an amazing success offering its prearranged conference speakers and chat rooms for registered participants. So, although there was much disappointment that our organizing efforts had to be rearranged and travel plans cancelled, we still “met” and shared each other’s experiences, knowledge and talents. The Jordan Art Gallery closed its doors until May, but continued to “open” to the public via its website. As an aside, we sold our Fenwick home that weekend and bought a new townhouse in Ridgeway. The start of another chapter in our personal lives.)

The image was “larger than life” which in my mind commanded a scale beyond my usual. I had saved an old “throw” that had enough porosity to allow for needled felting. It measured just enough for SAQA’s call for entry themed/titled “Light the World” https://www.saqa.com/events/saqa-calls-entry, which I had thought about as well over the summer. Now was the time to begin with a deadline of November 30. I had not entered a needle felted piece, so this would be the first, and it would incorporate stitching through layers. There was also a scurry of improvising as my 12 inch square sponge was not going to offer enough underlay for working up the piece. Hastily, I peeled away the covers of my 4 flat outdoor sponge cushions and laid them out, side by side. They nicely fit my fold out table width-wise and the 60 inch width of the work.

As with all my other needle felted works, the ground composition is laid out with wool, then the detailing layers comprise various silk fibres and other plant and animal fibres to add texture, colour and light – lots of it in this case to work with the image which I put through Adobe Photoshop to enhance the blues and contrast of the original photograph. The composition nicely fit the “x 3” rule.

The above images show the work progressing in its early stages from something flat in both colour and dimension. As contrasting colours and materials are added, the image and impact should, with some luck (for I believe it is only a select few works that have a magical property), begin to “appear.”

As the work progresses, it is both exciting and disappointing. As with any artwork, there is continual problem solving and a switch between observing, rendering and tedious work. There is endless needle punching involved, first securing with a single needle, then using my spring loaded, 5-in-one punch to work with the texture and against it. By the time all is completed, I will have worked over the surface more than a dozen times. With the smaller works, I also flip the work over and needle felt through the back layer as well to secure in both directions. I am not sure if I will with this piece.

After many hours working on the sky formations, it’s time to return to the foreground. My handspun is invaluable for outlining the tree formations and beginning work on the vineyard. I have run into a roadblock with the mid-ground skyline. As the tree formations extend into the sky background, I will have to stop to work on the Toronto and surrounding area skyline. But just how to go about this work is foremost in my problem solving mind.

Using my Publisher program together with some mathematical calculations, I am able to generate an exact skyline. The remainder of the work is my own rendition; however, I feel it important that the skyline be recognizable as what it is. Colour and eventually light will be important, as well as the profile. The skydome is really prominent. See below the steps from felting the long blue skyline to cutting then felting in place. I can now go back to build the tree tops that overlap into the skyline.

My next posting will cover the foreground as I build up texture, colour and light. It is amazing how much the eye begins to see as the work progresses.

Several weeks have gone by, but I have been busy. With the November 30 deadline for this submission looming, my focus was on completing the project. Days of adding detail and texture, working on the composition itself and stabilising to a quilted backing (repurposed, bed protector quilt). Below you can see the dramatic cloud formations taking on more dimension and contrast. The top layer of felting is now being stitched through to the backing to stabilise and to add a 3-dimensional effect.

The foreground was an especially detailed portion of the piece requiring both the application of fibre variations for texture and colour, but also the overlay of handspun yarns which required invisible stitching to anchor securely. Here you can see the sewing pins anchoring the top layer to the backing ready for stitching. The reverse is just a recycled, quilted cotton bed protector.

The quilt is nearing completion with just edges to finish before photographing. I set up my new photography studio for this large needle felted work. Using the tip from SAQA to use insulation panels, I took 3 side by side, covered them with stretched canvas. This method allows you to use sewing pins to hold the work in place. Below is the final work, 45 inches high x 58 inches wide.

It was submitted to The Grand National call for entry “Crossroads” with the following statement and biography. I have a price of $3,500 on it.

Corona Premonition, March 13, 2020

For Southern Ontario, March 13, 2020 signifies the end to large gatherings, closure of non-essential services and isolation.  My needle-felted artwork is based on a photograph which I took on that symbolic day.  This premonitory view of a “corona” cloud formation above 17th Street descending the Niagara escarpment, over Lake Ontario and distant Toronto also captures a physical crossroad leading into an unawakened vineyard.  17th Street itself leads to old Lakeshore Road which runs the circumference of Lake Ontario.  The work is a metaphorical crossroad intersecting the “normal” and the “pandemic” landscape.

My fibre and textile artwork explores nature and its ecological fragility.  Educated in fine arts and interdisciplinary Canadian Studies provides me with a rooted knowledge; my lived experience in the Fiji Islands, New Zealand and Canada, my career as an educator, and my travels, prompt me to create and share these perspectives. 

Needle felted and quilted image Corona-Premonition, March 13, 2020

Update: The artwork has been accepted into the Crossroads exhibition and will travel Canada over the next 2 years.